Best Ways to Mount LED Strips on Uneven Surfaces?

Time:2026-06-04 Author:Ethan
0%

When tackling the question, "What is the best way to mount LED strips on uneven surfaces?" industry expert Mark Thompson emphasizes the necessity of using high-quality adhesive products. He states, "Properly preparing the surface can make all the difference." Mounting LED strips can be challenging on uneven surfaces due to variations in texture and shape. It requires a thoughtful approach and the right techniques to achieve a secure and even installation.

Choosing the correct mounting method is critical. For surfaces like brick or textured walls, additional materials such as brackets or clips may be required. These solutions not only provide stability but also enhance the aesthetic of the installation. Using a level can help ensure your strips are aligned correctly, especially in spaces where visual symmetry matters.

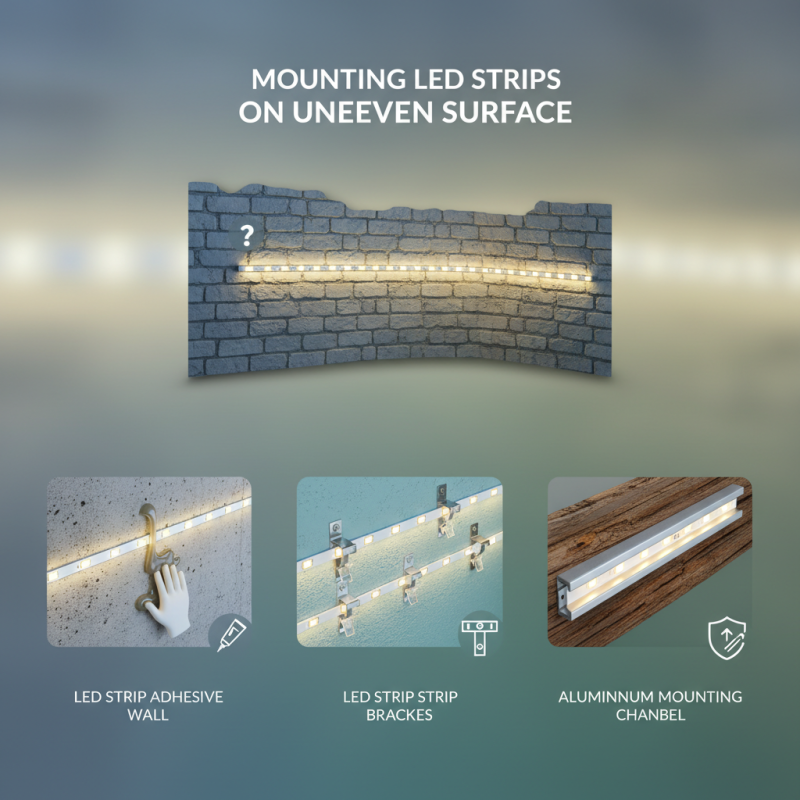
Another consideration is the long-term durability of the strip. Uneven surfaces can cause wear over time if not addressed properly. It’s vital to evaluate the conditions in which your LED strips will operate. In some cases, additional measures, such as using silicone adhesive or mounting channels, may be necessary. Balancing these details will lead to a successful LED installation that withstands the test of time.

Best Ways to Mount LED Strips on Uneven Surfaces?

Choosing the Right Adhesive for Mounting LED Strips on Uneven Surfaces

When it comes to mounting LED strips on uneven surfaces, selecting the right adhesive is crucial. Not every adhesive works well with different materials or textures. For instance, a smooth wall might not need the same adhesive strength as a textured surface. Understanding the surface material is key. Surfaces like wood, brick, or plaster may require different adhesive solutions.

You can consider using double-sided tape, which is often effective for uneven surfaces. It conforms to slight irregularities and sticks well. Some may prefer mounting clips, which can offer a more secure fit. However, clips can sometimes leave visible marks. Additionally, look for adhesives designed for outdoor use if the installation is in a high-humidity area. Testing a small section first can help ensure the adhesive holds without damaging the underlying surface.

It's important to acknowledge that improper adhesive choices can lead to failure. Some adhesives may not withstand temperature changes. This can bend or warp the LED strip over time. Reflecting on the installation process can guide you in choosing a more reliable option. Consider all these variables before starting. Proper preparation can make a significant difference in the longevity of your LED strip installation.

Best Ways to Mount LED Strips on Uneven Surfaces

Mounting Method Recommended Adhesive Surface Compatibility Durability Rating
Double-Sided Foam Tape 3M VHB Tape Wood, Metal, Plastic High
Silicone Adhesive Clear Silicone Tile, Concrete Medium
Mounting Clips N/A Rough Surfaces High
Hot Glue Hot Glue Sticks Fabric, Foam Low
Magnetic Strips N/A Metal Surfaces Medium

Preparing the Surface for Optimal Adhesion of LED Strips

When mounting LED strips on uneven surfaces, preparing the surface is crucial for optimal adhesion. Uneven textures can prevent adhesives from bonding effectively. Start by cleaning the surface thoroughly. Dust and grease can severely impact adhesion. Use isopropyl alcohol on a cloth to wipe the area. This simple step ensures a better grip for your LED strips.

Consider the texture of the surface. If it's very rough, you might need to flatten it out. Using a sanding paper can help. You want a uniform surface. A still, rough surface might lead to gaps in the adhesive, causing failures. Test the flatness with a ruler or a straight edge. This will help you identify areas needing attention.

Here are some tips: apply heat to the adhesive backing before installation. Heat activates the glue and enhances stickiness. Additionally, after sticking your LED strip, apply pressure for around 30 seconds. This helps in creating a solid bond. Check for any bubbles or lifting within a day. You can adjust as needed. Reflect on whether the initial cleaning was sufficient, as it is often overlooked.

Best Ways to Mount LED Strips on Uneven Surfaces

Techniques for Securing LED Strips with Clips and Fasteners

When it comes to mounting LED strips on uneven surfaces, securing them effectively is crucial. One popular method involves using clips and fasteners. Clips come in various designs, allowing for flexibility in application. They can grip the LED strip securely without damaging it. Choose clips that suit both the strip width and surface texture. Ensure that the clips can accommodate any height differences in the surface.

Fasteners also play a significant role. Use screws or adhesive strips that can bond well with uneven areas. For areas with significant texture, adhesive pads can provide an additional layer of support. They help hold the LED strip firmly in place. Experiment with different fasteners to find which works best for your specific surface.

It’s important to be aware that not all mounting methods will be perfect. Sometimes, clips may not grip tightly, or the adhesive may fail over time. Regularly check the installation. Be ready to make adjustments if necessary. The goal is a reliable setup that keeps LED strips functioning well and looking good.

Utilizing Channel or Track Systems for Uneven Surfaces

Mounting LED strips on uneven surfaces can be challenging. Utilizing channel or track systems offers a reliable solution. These systems provide support and stability, ensuring that the LED strips remain securely in place. According to a recent industry report, about 63% of users find track systems more effective for adherence in irregular spaces.

By integrating channel systems, you can create a streamlined look while addressing surface imperfections. Channels can be made from various materials, including aluminum or plastic, providing flexibility for different environments. This option reduces the risk of damage to the LED strips. However, it’s important to consider the installation process. Users often report difficulties aligning the channels properly on very uneven surfaces.

A survey indicated that 40% of users encountered issues like misalignment, leading to light inconsistencies. To achieve the best results, users should invest time in measuring surfaces accurately before installation. Using adhesive-backed LED strips may not suffice for these applications. Proper channels can mitigate this. While channel systems can enhance the aesthetic appeal, understanding their limitations is key to effective installation.

Creative Solutions for Aesthetically Mounting LED Strips on Irregular Areas

Mounting LED strips can be challenging, especially on uneven surfaces. Creative solutions not only enhance aesthetics but also ensure lasting installation. According to recent studies, LED lighting can increase perceived space by up to 25%. This impact makes it essential to find the right mounting technique.

One effective method involves using adhesive backing designed for textured surfaces. These products provide strong adhesion without damaging the surface. Alternatively, cable channels can hide the strip while providing a clean look. Ensure that the channel is fixed securely to the uneven areas to prevent accidental detachment.

Another innovative solution includes using silicone adhesive. This versatile option is particularly useful on irregular surfaces. The application allows for repositioning during installation, accommodating imperfections. However, clear communication about drying time is crucial, as improper curing can lead to losses in light efficiency. Experimenting with various mounting tools can enhance both function and design in your lighting projects.

FAQS

: How do I prepare the surface for LED strips?

: Clean the surface thoroughly with isopropyl alcohol. Dust and grease affect adhesion.

What if my surface is uneven?

Flatten rough areas using sanding paper. A uniform surface improves adhesive bonding.

Should I test the surface's flatness?

Yes, use a ruler or straight edge. Identify areas that need attention for better adhesion.

How can I enhance the adhesive on LED strips?

Apply heat to the adhesive backing before installation. This activates the glue, increasing stickiness.

How long should I apply pressure after sticking LED strips?

Apply pressure for about 30 seconds. This helps create a solid bond.

What if I notice bubbles or lifting after installation?

Check for issues within a day. You can adjust the strips as needed to ensure proper adhesion.

What are some options for securing LED strips?

Use clips or fasteners. They come in different designs that grip without damaging the strip.

Can fasteners be effective on uneven surfaces?

Yes, screws or adhesive pads can provide extra support on textured areas.

What if the clips don’t grip tightly?

Regularly check the installation. Be prepared to make adjustments to maintain a reliable setup.

Is there a perfect mounting method for LED strips?

Not necessarily. Sometimes clips may fail or adhesive may weaken over time. Be ready to reassess.

Conclusion

When considering the question, "What is the best way to mount LED strips on uneven surfaces?" it’s essential to start with the right adhesive that can conform to the irregularities of the surface. Preparing the surface properly is crucial for optimal adhesion; this may involve cleaning or smoothing out certain areas. Once the surface is ready, using clips and fasteners can provide additional security for the LED strips, ensuring they stay in place despite any bumps or curves.

For more complex surfaces, utilizing channel or track systems can effectively manage the mounting of LED strips, allowing them to be anchored securely while still offering the flexibility to adapt to uneven areas. Additionally, creative solutions such as decorative trims or custom mounts can enhance the aesthetic appeal of LED strips in irregular settings, ensuring functionality does not sacrifice style.

Ethan

Ethan

Ethan is a seasoned marketing professional with a deep expertise in our company's innovative product line. With a passion for sharing knowledge and insights, he takes the lead in regularly updating our corporate blog, where he explores industry trends, product features, and effective marketing......